No more rock 'n roll
Back to Land Rover page
Back to home page
Background
I had been looking into upgrading the rear suspension for sometime; earlier in the year driving on some of the Scottish minor roads in a strong side-wind had been quite challenging. I did not want to stiffen up the suspension too much though and reduce the articulation. Billing (2008) was a useful source of ideas. The following upgrade was initially considered as an experiment to see if I could get a stiffer suspension at a reasonable cost and without resorting to the very heavy duty springs and shocks; it worked better than I might have expected.
Having seen the upgrade of Sarah’s 127 I bought a pair of nearly-new RKB 101111 springs (at Billing) for £20 (see http://www.red90.ca/rovers/springinfo.html for spring details).
It also looked worthwhile to increase the damping by doubling up on rear
shock absorbers (again from Sarah’s 127); my MoT garage had recently suggested
that the existing shocks were not up to the job although they met MoT requirements.
There seemed to be two options; as with Sarah’s, a kit to put two shocks in parallel
using the existing brackets or, as on several demonstration machines at Billing, an
additional shock absorber to the rear of the back axle with additional fixing points
on the axle and the chassis.
Having had a close look under my 127 I noticed that the off-side chassis member had been pre-drilled to accept a second standard shock absorber bracket to the rear of the axle and also the chassis was internally reinforced for the securing bolts; not so though on the near side (but see below). I chose the second option and bought a kit of parts from Mail Order 4x4 although these no longer seem to be available.
Springs
Putting on the new springs was fairly straightforward. I had previously taken out the
inner helper springs as even over bumps on minor roads the shock absorbers were reaching
their limits but even so the back of the 127 still seemed to stand higher than others
at Billing in 2008. I installed the new springs and put the helper springs back (after
a coat of paint). The back then stood about 1.25 inches lower than before; now about
4.25 inches between the axle and the bump stop – before it was about 5.5 inches.
The initial lower loading the RKB 101111 springs was almost (but not quite) taken up
so I was almost into the 420 lb/in range of the springs (against 330 lb/in for the standard
springs without the inner helpers). The ride? Well - it didn’t roll
any more on corners and I could almost throw it around a fairly tight bend that would
have been quite scary before.
Shock absorbers
The kit was OK. It included standard upper brackets to be bolted onto the chassis, the necessary fixing bolts and anti crush tubes. The lower brackets to be welded onto the axle were pieces of preformed and bent steel. The upper bracket was an easy fit particularly on the off-side where the holes were already drilled.
 The
near side was not so easy - the exhaust was in the way! The existing exhaust was nearing
the end of its life so a new one for a 300tdi was bought from Paddocks which was a slightly
different shape from the one for the 8 cylinder petrol and when fitted gave enough clearance
for the new shock absorber.
The
near side was not so easy - the exhaust was in the way! The existing exhaust was nearing
the end of its life so a new one for a 300tdi was bought from Paddocks which was a slightly
different shape from the one for the 8 cylinder petrol and when fitted gave enough clearance
for the new shock absorber.
Fitting the near-side upper bracket was fairly easy. I measured up to where the bracket
position matched the position on the off-side, drilled through the chassis. I discovered
that the chassis was internally reinforced here as well – so no need for the anti
crush tubes. The lower brackets were not so easy - they needed a fair bit of grinding
and bending to fit and even then I did not get it quite right but they are near enough. 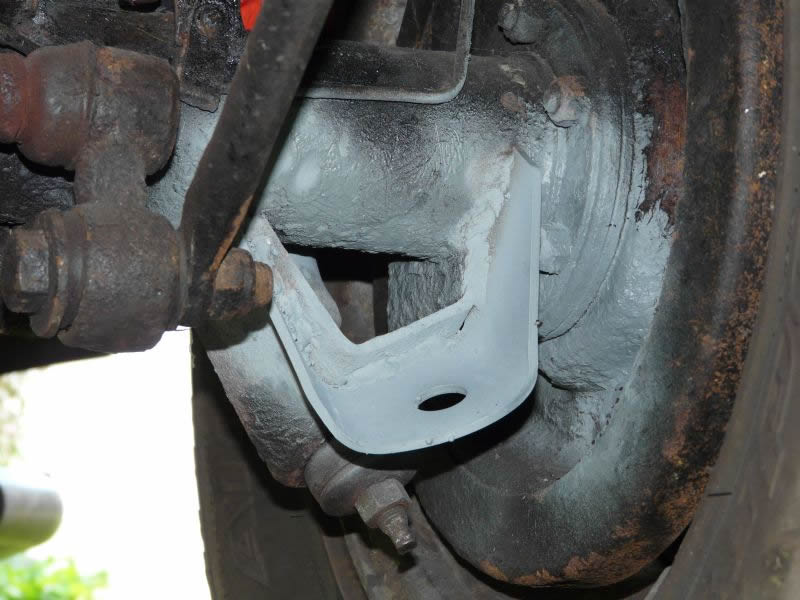
The ride? The difference was not so dramatic as the new springs but nevertheless there was a very noticeable improvement in handling. It was not easy to find an uneven road locally that I could drive along particularly quickly – the upgrade should come into its own in foreign parts ands also perhaps on the “tram-lines” on some of our motorways.
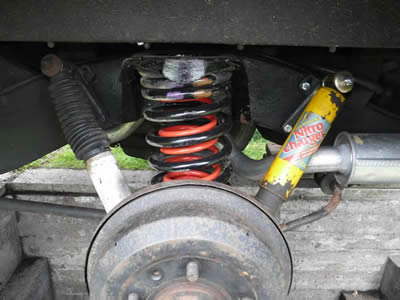
Picture
The new springs, new exhaust and twin shock absorbers shown above – I had robbed the Series 3 for the time being to save buying a new set. Click on the small picture of the bracket for a larger picture.
August 2008.